Bring Your Own Dockerfile: Deploy Anything That Runs in a Container
When your language or setup is not on the list, a Dockerfile is the contract. A Rust service, a two-stage build, a cache that makes the second deploy 40 seconds faster, and the four rules Light Cloud needs.



On this pageShowHide
To deploy any app on Light Cloud with your own Dockerfile, put the Dockerfile at the root of the repository, EXPOSE the port your app listens on, read that port from the PORT environment variable, push to GitHub and click Deploy. Light Cloud builds your Dockerfile as it is, with a layer cache that covers every stage, and runs the image. Anything that runs in a Linux container can be deployed this way.
In my run a Rust service was live 3 minutes after the first click, and a new instance answered 0.13 seconds after it started.
What you will build
A small word-counting API written in Rust with axum, a language Light Cloud does not build on its own. The Dockerfile makes it deployable:
POST /countreturns the characters, words and lines of a text.GET /healthanswers{"status":"ok"}.- A two-stage Dockerfile compiles in a large Rust image and ships only the binary.
Source code: github.com/light-cloud-com/tutorial-dockerfile-app.
When to bring your own Dockerfile
Light Cloud builds Node.js, Python, Go, Java, .NET, PHP, Ruby and static sites without one. Bring your own when:
- your language is not on that list (Rust, Elixir, Deno, C++, ...);
- you need system packages, such as
ffmpegor a PDF renderer; - you already have a Dockerfile that works and want exactly that image in production.
The four rules
Whatever is inside, a Dockerfile that works on Light Cloud follows four rules:
- Listen on
PORT, on0.0.0.0. Light Cloud setsPORT;localhostinside a container is not reachable from outside. EXPOSEthat port. Light Cloud reads it to know where to send traffic.- Stop cleanly on
SIGTERM. That is how an old instance is told to go. - Log to standard output. One JSON object per line with a
severitygets the right level in the Logs tab.
Before you start
- Rust 1.85 or later, for the 2024 edition; I used 1.97.1. Only needed to run the app on your machine: the build happens in Docker.
- Git and a GitHub account.
- A free Light Cloud account at console.light-cloud.com with GitHub connected.
- A terminal with curl. On Windows, use PowerShell 7 and
curl.exe, which ships with Windows 10 and 11.
Step 1: Create the app
$ cargo new tutorial-dockerfile-app
    Creating binary (application) `tutorial-dockerfile-app` package
$ cd tutorial-dockerfile-app
$ cargo add axum tokio --features tokio/full
      Adding axum v0.8.9 to dependencies
      Adding tokio v1.53.1 to dependencies
$ cargo add serde --features derive
      Adding serde v1.0.229 to dependencies
$ cargo add serde_json
Adding serde_json v1.0.151 to dependenciesPS> cargo new tutorial-dockerfile-app
Creating binary (application) `tutorial-dockerfile-app` package
PS> cd tutorial-dockerfile-app
PS> cargo add axum tokio --features tokio/full
Adding axum v0.8.9 to dependencies
Adding tokio v1.53.1 to dependencies
PS> cargo add serde --features derive
Adding serde v1.0.229 to dependencies
PS> cargo add serde_json
Adding serde_json v1.0.151 to dependenciesOutput is trimmed. cargo new also creates a Git repository with a .gitignore for /target.
Step 2: Write the service
use axum::{Json, Router, http::StatusCode, routing::{get, post}};
use serde::{Deserialize, Serialize};
use serde_json::json;
use tokio::signal::unix::{SignalKind, signal};

#[derive(Deserialize)]
struct CountRequest {
    text: String,
}

#[derive(Serialize)]
struct CountResponse {
    characters: usize,
    words: usize,
    lines: usize,
}

// One JSON object per line; the Logs tab reads "severity" and "message".
fn log(severity: &str, message: &str) {
    println!("{}", json!({ "severity": severity, "message": message }));
}

async fn root() -> Json<serde_json::Value> {
    Json(json!({ "service": "word counter", "version": 3, "try": "POST /count with {\"text\": \"...\"}" }))
}

async fn health() -> Json<serde_json::Value> {
    Json(json!({ "status": "ok" }))
}

async fn count(Json(body): Json<CountRequest>) -> Result<Json<CountResponse>, (StatusCode, String)> {
    if body.text.len() > 100_000 {
        return Err((StatusCode::PAYLOAD_TOO_LARGE, "text is longer than 100000 bytes".into()));
    }
    Ok(Json(CountResponse {
        characters: body.text.chars().count(),
        words: body.text.split_whitespace().count(),
        lines: body.text.lines().count(),
    }))
}

#[tokio::main]
async fn main() {
    // Light Cloud passes the port in PORT; 8080 matches EXPOSE in the Dockerfile.
    let port = std::env::var("PORT").unwrap_or_else(|_| "8080".into());
    let app = Router::new()
        .route("/", get(root))
        .route("/health", get(health))
        .route("/count", post(count));

    let listener = tokio::net::TcpListener::bind(format!("0.0.0.0:{port}")).await.unwrap();
    log("INFO", &format!("listening on port {port}"));

    // Finish running requests when Light Cloud stops the instance with SIGTERM.
    axum::serve(listener, app)
        .with_graceful_shutdown(async {
            signal(SignalKind::terminate()).unwrap().recv().await;
            log("INFO", "SIGTERM received, shutting down");
        })
        .await
        .unwrap();
}
Rules 1, 3 and 4 are in the code: it binds 0.0.0.0 on PORT, it waits for SIGTERM to shut down, and it prints JSON log lines with a severity.
Step 3: Write the Dockerfile
# Stage 1: compile. The Rust toolchain is large, but it never reaches production.
FROM rust:1.97-slim AS builder
WORKDIR /app

# Build the dependencies first, with an empty main.rs, so this slow layer is
# cached and only rebuilt when Cargo.toml or Cargo.lock change.
COPY Cargo.toml Cargo.lock ./
RUN mkdir src && echo "fn main() {}" > src/main.rs && cargo build --release && rm -rf src

COPY src ./src
RUN touch src/main.rs && cargo build --release

# Stage 2: run. Only the binary goes into a small Debian image.
FROM debian:bookworm-slim
RUN useradd --system --uid 10001 app
COPY --from=builder /app/target/release/tutorial-dockerfile-app /usr/local/bin/app
USER app

# Light Cloud reads EXPOSE to know which port to send traffic to.
ENV PORT=8080
EXPOSE 8080
CMD ["app"]
Three habits in there are worth copying into any Dockerfile:
- Two stages. The build stage has the compiler and every build tool; the final image has the binary and nothing else. The image you run is small and has less in it to attack.
- Dependencies before source. Copying only
Cargo.tomlandCargo.lockfirst, and building them on their own, puts the slow dependency build in a layer that survives code changes. The same pattern works aspackage.jsonthennpm ci, orrequirements.txtthenpip install. - A non-root user.
USER appmeans a bug in the app cannot write to the system. Port 8080 needs no special rights.
Keep the build context small:
target
.git
Step 4: Run it on your machine
You do not need Docker for this: the same code runs with Cargo.
$ cargo run --release
    Finished `release` profile [optimized] target(s) in 1.80s
     Running `target/release/tutorial-dockerfile-app`
{"message":"listening on port 8080","severity":"INFO"}PS> wsl
$ cargo run --release
Finished `release` profile [optimized] target(s) in 1.80s
Running `target/release/tutorial-dockerfile-app`
{"message":"listening on port 8080","severity":"INFO"}Output is trimmed; the first run also compiles every dependency. The SIGTERM handler uses Unix signals, which is right for a container that runs on Linux, so on Windows run the app inside WSL (with Rust installed there) or only in Docker. Stopping it with Ctrl+C sends SIGINT, not SIGTERM, so you will not see the shutdown line locally. From a second terminal:
$ curl -X POST http://localhost:8080/count -H "content-type: application/json" -d '{"text":"Bring your own Dockerfile.\nDeploy anything."}'
{"characters":43,"words":6,"lines":2}PS> curl.exe -X POST http://localhost:8080/count -H "content-type: application/json" -d '{"text":"Bring your own Dockerfile.\nDeploy anything."}'
{"characters":43,"words":6,"lines":2}If you have Docker, docker build -t word-counter . and docker run -p 8080:8080 word-counter run exactly what Light Cloud will run.
Step 5: Push and deploy
$ git add -A
$ git commit -m "Rust word counter with a multi-stage Dockerfile"
# Create an empty repository named tutorial-dockerfile-app on github.com/new first.
$ git remote add origin https://github.com/YOUR-USERNAME/tutorial-dockerfile-app.git
$ git push -u origin main
To https://github.com/YOUR-USERNAME/tutorial-dockerfile-app.git
 * [new branch]      main -> main
branch 'main' set up to track 'origin/main'.PS> git add -A
PS> git commit -m "Rust word counter with a multi-stage Dockerfile"
# Create an empty repository named tutorial-dockerfile-app on github.com/new first.
PS> git remote add origin https://github.com/YOUR-USERNAME/tutorial-dockerfile-app.git
PS> git push -u origin main
To https://github.com/YOUR-USERNAME/tutorial-dockerfile-app.git
* [new branch] main -> main
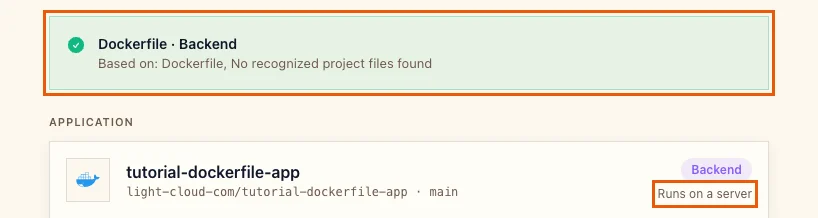
branch 'main' set up to track 'origin/main'.In the Light Cloud console, click New..., then Deploy from GitHub, and pick the repository. Light Cloud shows Dockerfile / Backend and Runs on a server: it found no framework it builds itself, and a Dockerfile that says how to build this one.
Port under Advanced is 8080, read from EXPOSE. Click Deploy. The first build compiles every dependency; in my run the service was live 3 minutes 17 seconds after the click.
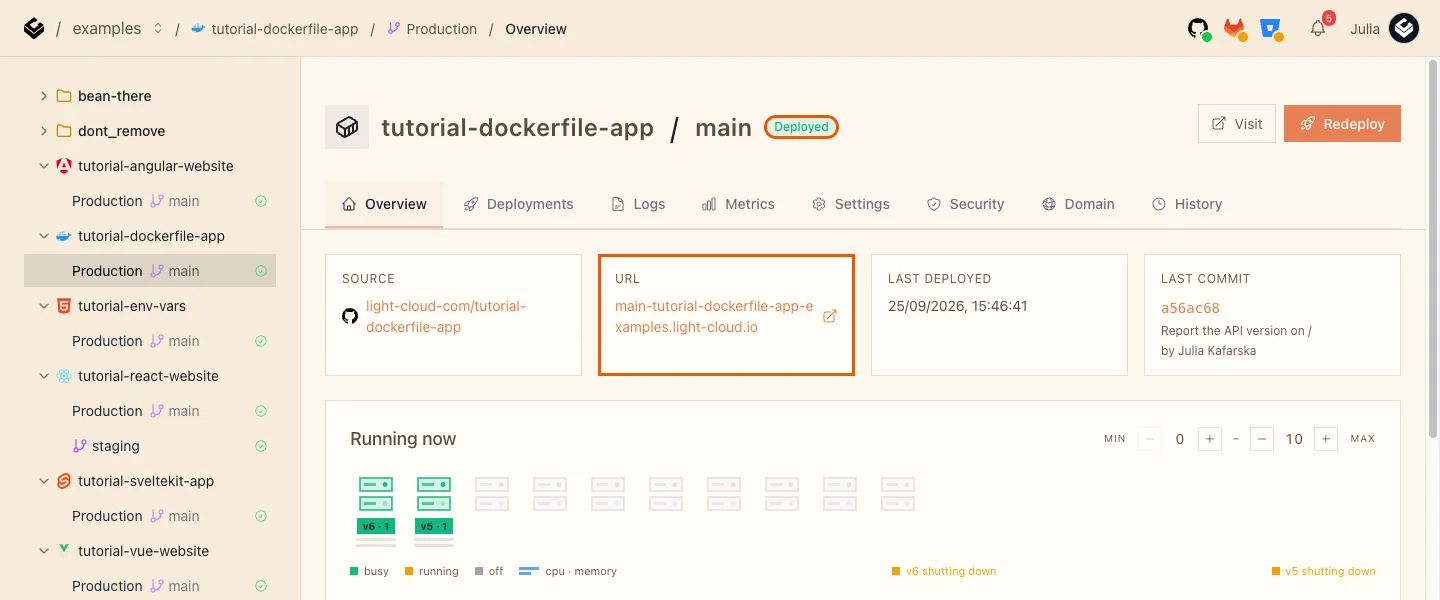
$ curl -X POST https://main-tutorial-dockerfile-app-yourworkspace.light-cloud.io/count -H "content-type: application/json" -d '{"text":"Bring your own Dockerfile.\nDeploy anything."}'
{"characters":43,"words":6,"lines":2}PS> curl.exe -X POST https://main-tutorial-dockerfile-app-yourworkspace.light-cloud.io/count -H "content-type: application/json" -d '{"text":"Bring your own Dockerfile.\nDeploy anything."}'
{"characters":43,"words":6,"lines":2}Step 6: See the layer cache at work
Change something in src/main.rs, commit and push. Deploy on push rebuilds the image, and this time the dependency layers come from the cache. From the build logs of two pushes in a row:
| Build | Dependency stage | App compile | Whole build |
|---|---|---|---|
| First, empty cache | 51.2 s | 7.5 s | 1 min 55 s |
| After a code change | cached | 8.0 s | 1 min 12 s |
The cache covers every stage of the Dockerfile, including the builder stage that never ships. That is why the order of COPY lines matters: everything above the first changed file is reused.
In the Logs tab the rollout is visible too: the new instance logs listening on port 8080 0.13 seconds after it starts, and the old one logs SIGTERM received, shutting down before it goes.
Troubleshooting
The deploy fails the health check: the container did not listen on the port
The app listens on 127.0.0.1 or on a fixed port. Bind 0.0.0.0 and read PORT. Check that EXPOSE matches what the app uses when PORT is not set.
More tutorials


Deploying ASP.NET Core Without Azure
Deploy an ASP.NET Core minimal API on .NET 10 to Light Cloud from GitHub: the SDK matches your TargetFramework, the port is set for you, health checks and validation included, and no Azure account needed.
 Julia
Julia

Spring Boot on Light Cloud: JAR, Port and Memory Settings
Deploy a Spring Boot app to Light Cloud without a Dockerfile: Gradle or Maven builds the JAR, SERVER_PORT is set for you, and JAVA_TOOL_OPTIONS=-XX:MaxRAMPercentage=75 raises the heap from 123 MB to 371 MB on a 512 MB instance.
Julia

A Go (Gin) API Deployed in Five Steps
Deploy a Go API built with Gin to Light Cloud without a Dockerfile: go.mod and main.go at the root, PORT from the environment, GIN_MODE=release, JSON logs with a severity, and a quarter-second cold start.
Julia